Thursday, March 18, 2010

Call Flow from OCS 2007 R2 to Cisco Call Manager

My current client is interested in integrating Microsoft OCS 2007 R2 Enterprise Voice with Cisco Unified Call Manager (CUCM).  As we began our discussions, they became interested in better understanding the call flow.  I did some research and found very little in the way of easy-to-understand information so, I picked up the phone and called a colleague that is expert in the area.


Cisco Subsciber Call Flow

The illustration above gives you a high-level view of the call flow between OCS and Cisco’s voice platform.  I’ve illustrated two scenarios;  a) A single party, point-to-point call and b) a multi-party conference.

Scenario A – Single Party, Point to Point Call

When a call is made from an OCS Enterprise Voice-Enabled User (1) to an internal Cisco Subscriber the call will be routed to the mediation server where the Direct SIP (2) connection between the mediation server and the Call Manager will be used to setup the call using SIP.  If the call is setup properly, the Call Manager will return the MAC address of the subscribers phone and a direct RTP Stream (3) will be established between the mediation server and the Cisco end-point.  Traffic from the OCS User (1) to the mediation server will use Microsoft’s RT-Audio Codec.  The mediation server will transcode the RT-Audio RTP stream to G.711 for delivery to the Cisco End Point.

Scenario B – Multi-Party Call

A multi-party call is a little more complicated as Cisco requires a Media Termination Point (5a, 5b) which will aggregate all the RTP streams and distribute them appropriately.  Cisco gives you a couple options for implementing the MTP.  They offer a software based MTP (5a) that will load up as part of the IOS on the Call Manager itself.  This solution is great for testing or smaller implementations.  However it does not scale well for large interoperability scenarios.  The alternative is to implement a hardware based DSP (Digital Signal Processor) on the Cisco Voice Gateway (example 3845) that will run the MTA.  This alternative is great for larger scale implementations.

When a call is originated from OCS (1), destined to multiple Cisco subscribers, the call is setup between the mediation server and Call Manager (2) using SIP (2).  The setup will see that the OCS user wants multiple Cisco end points and will return an path that sends all RTP streams to the MTP (4).  The MTP (5a, 5b) will then aggregate the RTP stream to the appropriate Cisco end points (6).

Note:  OCS 2007 R2 supports Direct SIP with Cisco Unified Call Manger 4.x, 5.x, & 6.x. (http://technet.microsoft.com/en-us/office/ocs/bb735838.aspx) and soon will support Cisco’s 7.x release of CUCM.  Cisco, on the other hand will tell you that they don’t “support” Direct SIP to OCS on any platform, other than 7.x.  That said, I’ve seen Direct SIP work well with the Microsoft supported versions and one shouldn’t let Cisco’s FUD keep you from deploying Direct SIP to these down-versions.

So I hope this helps simplify the call flow between Cisco and OCS.  Send your comments or questions.  Until next time.

-D

Tuesday, February 16, 2010

Exchange 2007/2010 - Enable and Disable IMAP and POP with PowerShell

By default, POP and IMAP are enabled on users when they are Mailbox Enabled in Exchange 2007.  While this is OK, if you have a blanket restriction on POP and IMAP and can shut down the services on the Client Access Server, it’s not so great if you need POP/IMAP for specific purposes like monitoring or application drop-box, but due to security concerns want to restrict POP/IMAP for the general population.

Fortunately, Exchange 2007/2010 allows you to enable or disable most supported protocols on a per user basis.  This fact combined with PowerShells use of the native .NET libraries for managing Exchange will give you great flexibility and ease when faced configuring protocols on a per user basis.

To start, create an Active Directory Group.  Add members to this group that are exceptions and will remain POP and IMAP enabled.  The code will parse the membership of this group and then execute some specific PowerShell cmdlets that will enact the appropriate setting.

First, we make an ADSI call to get the Exception Group.  We also variablize the groups members.

$gmbr = [ADSI]"LDAP://cn=PopEnabled,OU=groups,DC=c8nl,DC=com" #Edit the Group Name Only
$mbr = $gmbr.member

Next, get each CAS Mailbox.  Essentially, the Get-CASMailbox cmdlet will get all Exchange Mailboxes and allow us to enumerate the CAS settings specific for Exchange mailboxes, i.e., Protocols, OWA settings, etc.  We’ll loop through each returned object using ForEach-Object and then compare the returned distinguished name against the DNs returned from the Group Membership call above.  If the results match, then we call –PopEnabled and –ImapEnabled $true, otherwise, we set it the $false.

Get-CASMailbox -ResultSize unlimited | ForEach-Object {
    if($mbr -contains $_.DistinguishedName) {
        $_|Set-CASMailbox -PopEnabled $true
        $_|Set-CASMailbox -ImapEnabled $true }
    else {
        $_|Set-CASMailbox -PopEnabled $false
        $_|Set-CASMailbox -ImapEnabled $false }
    }

So a quick and handy way to use Active Directory Groups to modify Exchange settings.  There are several options for running this code.  It can be done manually, as needed, or it can be scheduled using a cron job.  Or if you really want to get fancy, you could run this as a Windows Service.  A future blog will focus on that method.  Until then.

D.

Tuesday, February 9, 2010

Add Root CA to Windows Certificate Store using C#

My current client has several laptop users that are not domain joined and, as a result, do not have the Internal Enterprise CA Certificate installed on their machines.  They asked me to write a little application that they can distribute to add the Root CA to these machines.

As always, I look at these projects as an opportunity to learn, and this short piece of code, while not elegant, provided that opportunity in spades.

Two specific areas that are new to me are Code Embedded Files and calling out to an EXE.  I’ll cover both in this blog post as well as provide the full code for sharing.

To start, I created a new Console Application.  I also added the two files that I wanted embedded; CertMgr.EXE and the RootCA.cer file.

When embedding a file, the Build Action of the file must be set to Embedded Resource and, optionally, the Copy to Output Directory can be set to Copy if Newer as illustrated in the screen shot below:

image

I also added the System.Diagnostics and System.Reflection .NET libraries to make calling the Assembly code necessary for unpacking the files. 

using System;
using System.IO;
using System.Diagnostics;
using System.Collections.Generic;
using System.Reflection;
using System.Text;

Next I set a couple string variables that identify a temporary storage location for the files I want to unpack, the certificate file itself, and the .NET Resource Tool CertMgr.EXE that I will use to simplify the installation of the Root CA.

    {
        static void Main(string[] args)
        {
            //set the variable strings
            string store = @"c:\cert";
            string rootFile = @"c:\cert\RootCA.cer";
            string certMgr = @"c:\cert\CertMgr.Exe";

I then move to extract each file from the Assembly package.  Note that the name of the file starts with the name of your application.  In my case, AddRootCA.CertMgr.Exe.  But first I check to see if the file already exists in the location I’ve called.

            //validate CertMgr.exe does not exist
            if (!File.Exists(certMgr))
            {
                //extract CertMgr.EXE from the Assembly
                Assembly certMgrAss = Assembly.GetExecutingAssembly();
                Stream certMgrStrm = certMgrAss.GetManifestResourceStream("AddRootCA.CertMgr.Exe");

I do a little error checking to ensure the stream is created properly.

                if (certMgrStrm == null)
                {
                    Console.WriteLine("Unable to Read CertMgr.Exe file.  Contact your administrator.");
                }

I then check to see if the storage location exists.  If it doesn’t, I create it.

                //Create c:\cert directory for storage
                if (!Directory.Exists(store))
                {
                    Console.Write(store + " does not exist.  Creating.....");
                    Directory.CreateDirectory(store);
                }

Next, I open up the directory and file, in this case the CertMgr.exe and then stream in the binary for the assembly object.

                //open the directory and file for writing
                FileStream certMgrFS = File.OpenWrite(certMgr);
                try
                {
                    // Save the File...
                    byte[] buffer = new byte[certMgrStrm.Length];
                    certMgrStrm.Read(buffer, 0, (int)certMgrStrm.Length);
                    certMgrFS.Write(buffer, 0, buffer.Length);
                    certMgrFS.Close();
                }

Lastly for this section, I catch any exceptions and write them our to the console for review.

                //write any errors to the Console
                catch (Exception ex)
                {
                    Console.WriteLine(ex);
                    Console.WriteLine("An error has occured adding CertMgr.  Press any key to continue...");
                    Console.Read();
                }
            }

The next section of code does virtually the same thing as above with one key exception; it executes the CertMgr.exe file with arguments to install into the certificate into the Local Machine’s Root Certificate Store.

            //validate RootCA.cer does not exist
            if (!File.Exists(rootFile))
            {
                //extract RootCA.cer from the Assembly
                Assembly RootCertAssembly = Assembly.GetExecutingAssembly();
                Stream RootCertStream = RootCertAssembly.GetManifestResourceStream("AddRootCA.RootCA.cer");
                if (RootCertStream == null)
                {
                    Console.WriteLine("Unable to Read RootCA.cer file.  Contact your administrator.");
                }
                //Create c:\cert if it does not exist
                if (!Directory.Exists(store))
                {
                    Console.Write(store + " does not exist.  Creating.....");
                    Directory.CreateDirectory(store);
                }
                //open the directory and file for writing
                FileStream rootFS = File.OpenWrite(rootFile);
                try
                {
                    // Save the File...
                    byte[] buffer = new byte[RootCertStream.Length];
                    RootCertStream.Read(buffer, 0, (int)RootCertStream.Length);
                    rootFS.Write(buffer, 0, buffer.Length);
                    rootFS.Close();
                }
                //catch any errors and write to console
                catch (Exception ex)
                {
                    Console.WriteLine(ex);
                    Console.WriteLine("An error has occurred adding the Root Certificate.  Press any key to continue...");
                    Console.Read();
                }

This is the section of code that calls CertMgr.Exe and passes in the certificate file name and several arguments to install the certificate.  I’m using standard .NET code to instantiate the CertMgr.exe program, but to execute inside the Windows 7/Vista User Account Control security model and on Windows XP machines where the user is not a local administrator, I’ve chosen to execute RunAs.exe as a process verb.  Key in this process call is to ensure UseShellExecute is set to true.  Failure to set this parameter on the process will cause the process to fail without errors.


                //call CertMgr.EXE and add the certificate to the Root Certificate Store
                finally
                {
                    ProcessStartInfo processRoot = new ProcessStartInfo();
                    processRoot.Verb = "runas";
                    processRoot.FileName = certMgr;
                    processRoot.Arguments = "/add c:\\cert\\rootca.cer /c /s /r localMachine Root";
                    processRoot.UseShellExecute = true;
                    Process rootProc = Process.Start(processRoot);
                    rootProc.WaitForExit();
                    rootProc.Dispose();

                }
            }

The last piece of code cleans up the c:\cert directory and all it contents.  And that’s it!

 
            if (Directory.Exists(store))
            {
                try
                {
                    Directory.Delete(store, true);
                }
                catch (Exception ex)
                {
                    Console.WriteLine(ex);
                    Console.WriteLine("An error has occured cleaning up.  Press any key to continue...");
                    Console.Read();
                }
            }
            Console.WriteLine("Complete!");
         }
    }
}

Enjoy this little piece of code!

D.

Thursday, February 4, 2010

Modifying Outlook’s Exchange Proxy Settings Programmatically using C#

Modifying Outlook settings using C# is relatively straight forward.  There is, of course the Outlook Object Model that will allow you to manipulate the behavior of Outlook and the Extended MAPI APIs that will provides access to the messaging subsystem.  However, neither of these approaches allow for a simple modification of an existing Outlook Profile.  To accomplish this, it’s best, IMHO, to directly edit the registry.

My specific directive was to modify the “On Fast Networks, Connect using HTTP…” setting.  My client had non-domain joined laptop users that he wanted to force into HTTP mode, largely because these laptops were often moving between wired/wireless/vpn networks and firewalls were preventing RPC traffic in some cases.  While Outlook should fall back to HTTPS, it was not and as a result, Outlook on non-domain joined laptops would hang when clients moved from one network to another.

The long term fix for this problem is, of course, to get laptops into the domain.  Once in the domain, a user certificate can be issues from the AD-integrated PKI and the laptops can be directed to an 802.11 wireless network.  The new wireless network will not have any port restrictions and allow TCP connectivity to Exchange.

In the meantime, my client needed a piece of utility code that would modify the Outlook profile and force HTTP connections in all circumstances.

My research uncovered some pointers to where in the registry I could make these changes.  I learned that most registry values are Binary and have specific values that will create various combinations inside the Outlook Profile.

For the Exchange Proxy Settings section of the profile, the following registry keys are located under:

HKEY_CURRENT_USER\Software\Microsoft\Windows NT\CurrentVersion\Windows Messaging Subsystem\Profiles\Outlook\13dbb0c8aa05101a9bb000aa002fc45a

00036623  (REG_BINARY) = Enables/Disables the “Connect using HTTP” box.
001f6622   (REG_BINARY) = Sets the address for the first text box labeled as https://
001f6625  (REG_BINARY) = Sets the address for the second text box labeled as “Principal name for proxy server”
00036627  (REG_BINARY) = Sets the the authentication type.  (01000000 = Basic, 02000000 = NTLM)
00036601 (REG_BINARY) = Sets cached Exchange mode.   (84010000 = Enabled.   84050000 = Enabled with public folders/favorites.  04000000 = Disabled.)
001e6608 (REG_SZ) = Stores the TCP/IP address, the NetBIOS computer name, or the DNS FQDN used to create the initial profile.
001e6602 (REG_SZ) = Stores the NetBIOS computer name where the mailbox is located.

So my code needs to open this registry path and modify the 00036623 Key.

I started by setting several variables, including the path to the hive and the key.  I also set the binary value for turning on “On fast networks, connect using HTTP first, the connect using TCP/IP”

image

static void Main(string[] args)
{
    Console.WriteLine("Turning on Outlook Anywhere support for fast networks....");
    String sKeyPath = "Software\\Microsoft\\Windows NT\\CurrentVersion\\Windows Messaging Subsystem\\Profiles";
    string oLPKey = "13dbb0c8aa05101a9bb000aa002fc45a";
    string oLOFNKey = "00036623";
    Byte[] bKeyValues = { 63, 00, 00, 00 };

One word of caution.  The registry expects a Hex value.  So BIN 63 = HEX 3f, which happens to be the HEX Outlook understands to turn on the fast network setting.  Other values will change the setting in other ways.  For example turning off the “On Fast Networks….” value is BIN 39 = HEX 27.  So the lesson is always use the decimal value in the code.  Windows will automatically convert it to HEX for you.  Use your friendly neighborhood BIN to HEX converter to get the proper values nailed down.

The next piece of code uses the Microsoft.Win32 Library to gain access to the registry.  This section pulls the all the profiles that are under the Windows Messaging Subsystem\profiles hive.  I set an integer value to 0 to assist in looping through all Outlook Profiles on the machine.

RegistryKey rootRegKey = Registry.CurrentUser;
rootRegKey = rootRegKey.OpenSubKey(sKeyPath);
string[] sValueName = rootRegKey.GetValueNames();
int i = 0;

Next, I loop through each profile found and get the key value.  This is critical, because I need to bind to each profile, look for the 13dbb0c8aa05101a9bb000aa002fc45a, the look for 00036623 key and change it’s value to match what I want to set.  Lastly, I Flush the registry key, which is to say, save and close the key.

foreach (string s in sValueName)
            {
                string val = (string)rootRegKey.GetValue(sValueName[i++]);
                RegistryKey subRegKey = Registry.CurrentUser;
                subRegKey = subRegKey.OpenSubKey(sKeyPath + "\\" + val + "\\" + oLPKey, true);
                subRegKey.SetValue(oLOFNKey, bKeyValues, RegistryValueKind.Binary);
                subRegKey.Flush();
                subRegKey.Close();
            }

Voila!  Fin!

Enjoy!

D.


Tuesday, February 2, 2010

Exchange 2007 - Web-based Exchange Object Provisioning (WExOP) using PowerShell, ASP.NET, and C#

It became very clear to me after several months with my latest customer that they were going to need a method for provisioning Exchange objects that didn't involve granting rights and distributing the Exchange Management Console to their global IT workforce.  The customer was replacing GroupWise 6.x with Exchange 2007 and wanted to take the opportunity to hem-in and centralize the widely distributed server and administrative footprint that is so common to GroupWise and NDS.  The proposed Exchange architecture centralized all servers to a central data center, but there was still discussion on the best way to distribute administrative tasks.

In centralizing Exchange, my customer needed a mechanism in which request for adds, changes, and deletes could be made to a centralized provisioning team who would then perform the tasks on the production system.  Of course there are several ways to do this.  We could introduce a new manual process or leverage the customer's existing ticketing system....or we could experiment a little do something simple and elegant.

Now it should be known that I'm not a dev-guy.  I'm a wannabe.  A poser!  The reality is that I'm an infrastructure guy that can script.  But, I'm always up for a challenge and always looking for opportunities to build "real" dev skills.  As I looked at this problem, I saw an opportunity for a poser to develop a simple solution using PowerShell, ASP.NET, and C#.

As all Exchange aficionados  know PowerShell rocks!!!!  In my opinion, next to x64, it is the innovation in Exchange 2007.  It is the foundation on which the solution was built.  But PowerShell could not front-end a simple solution, nor could it be distributed easily.  Wrapping PowerShell into a Win32/64 app using C# could simplify the end-user experience, but the distribution and updating of that type of application is burdensome.  The last possibility was to wrap PowerShell into a web-based application.  An easy decision, but one also fraught with pitfalls.  It is my hope that this blog will help others maneuver around those pitfalls.

Working with my good friend and colleague, Chad Gau (formerly of EMC, now with Statera), we designed a solution that was broken up into two distinct applications that derived off the same code base.  The first application developed was the provisioning application.  We titled this application ExOM (Exchange Object Management).  The second application was the requesting application which we titled ExReq (Exchange Requests).  As noted, these application were derived using the same code base yet there is a fundamental difference; ExOM has PowerShell wrapped up and executes directly against Exchange and Active Directory while ExReq simply takes the input and packages it off via email to the customers ticketing generating system where the request is routed appropriately.

What is common between ExOM and ExReq is the User Interface that is based on a hierarchy of options available for each Exchange object type.  I've characterized the hierarchy below:

image


User Interface

image

The UI for ExOM and ExReq was developed using ASP.NET 3.5 with ASP.NET AJAX Control Toolkit.  I used the Accordion control on the default.aspx page to pass along information on the various modules and maintain a change control log.  I used a Master Page to wrap the entire application and used the TreeView control for navigation control.

image

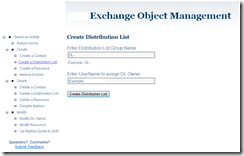
Subsequent pages look similar to the Create Distribution List page.  This page and several others have some interesting features, including leveraging the AJAX Auto-Complete control that is tied to a Web Service that queries Active Directory and .NET validation rules that check against Active Directory to ensure uniqueness.

Active Directory Web Service

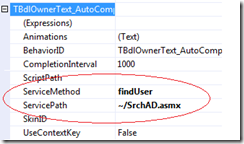
I created a Web Service that could be tied to the AJAX Auto-CompleteExtender.  I used this control extender extensively for any textbox that required a match to a valid object in the Active Directory.  I used this technique to reduce the number of errors that would otherwise be generated by mistyped or non-existent entities.  This feature also greatly simplified the user experience.  By extending a standard textbox with the AJAX extender and then associating the web service file service path and method, as seen in the example from the properties of the textbox below, a user can now simply type in the first 3 characters of the target Active Directory value and the web service automatically returns a list of matches directory from AD.  As the user continues to type in additional matching characters, the list narrows.

image

The web service code uses the System.DirectoryServices.ActiveDirectory and, of course, the System.Web.Services .NET libraries.  Within the code several things are happening.

NoteWhen you create a new .ASMX web service page in Visual Studio, the following line must be un-commented in order to run this code against an AJAX extension:

      [System.Web.Script.Services.ScriptService]


First, I wrote a method to bind to the root directory service entries:


      private string domainDNC
{
get
{
Domain dom = System.DirectoryServices.ActiveDirectory.Domain.GetCurrentDomain();
DirectoryEntry rootDSE = new DirectoryEntry("LDAP://" + dom.Name + "/rootDSE");
string domainDNC = (string)rootDSE.Properties["defaultNamingContext"][0];
return domainDNC;
}
}


Next, the directory path, authentication type, and search object are set:


            DirectoryEntry de = new DirectoryEntry();
de.Path = "LDAP://ou=xyz," + domainDNC;
de.AuthenticationType = AuthenticationTypes.Secure;
DirectorySearcher deSearch = new DirectorySearcher();
deSearch.SearchRoot = de;


I identify the properties that I want to pull:


            deSearch.PropertiesToLoad.Add("displayName");
deSearch.PropertiesToLoad.Add("cn");
deSearch.ClientTimeout = TimeSpan.FromSeconds(30);
deSearch.SizeLimit = 100;


I determine the sort order of the returned values:


            SortOption srt;
srt = new SortOption("cn", SortDirection.Ascending);
deSearch.Sort = srt;


I create a search filter and then execute the search and return the values to a collection:


      deSearch.Filter = ("(&(&(objectClass=User)(objectCategory=Person)(cn=" + prefixText.Trim() + "*)))");
SearchResultCollection results = deSearch.FindAll();


And last, the tricky part.  I take the results and add them to a list that is returned as an array.  The list then renders itself into the textbox as a drop-down list that will narrow as the user continues to type characters.


            List<String> CandidateList = new List<string>();
foreach (SearchResult sr in results)
{
foreach (string Candidate in sr.Properties["cn"])
{
CandidateList.Add(Candidate);
}
}
return CandidateList.ToArray();


Wrapping PowerShell Commands and calling them from C#


There are a couple ways to instantiate PowerShell from C#.  You can call a cmdlet then append parameters, line-by-line to build a string that can then be invoked inside the RunSpace.  Or, you can create a variable string that has the full cmdlet and its parameter contained within and then add the variable as a script to the RunSpace and then invoke.  I chose the latter method because it required less lines of code and the PowerShell cmdlet can be customized to use variables called in from the UI.


Pitfall:  You MUST run PowerShell within a RunSpace that can be called from the System.Management.Automation.Runspaces library.


To host PowerShell in C#, you must include the following .NET libraries:


     using System.Management.Automation.Host;
using System.Management.Automation.Runspaces;


The following example demonstrates the code used to invoke PowerShell to mailbox enable a new Exchange user.  This code expects the user to exist in Active Directory.


Pitfall:  Due to Active Directory replication latency, you must target a specific domain controller and use the -domaincontroller parameter on all PowerShell scripts.  Doing so will ensure the object you are creating or targeting is in a proper state.


The first step is to bind to a specific domain controller.  Note that I'm looking into a specific Active Directory site for the domain controller.


      Domain dom = System.DirectoryServices.ActiveDirectory.Domain.GetCurrentDomain();
DirectoryContext context = new DirectoryContext(DirectoryContextType.Domain, dom.Name);
DomainController dc = DomainController.FindOne(context, "Active Directory Site");


Then I create a PowerShell .NET RunSpace to run any PowerShell cmdlets.


            RunspaceConfiguration ExShell = RunspaceConfiguration.Create()
PSSnapInException snapInException = null;
PSSnapInInfo info = ExShell.AddPSSnapIn("Microsoft.Exchange.Management.Powershell.Admin", out snapInException);
Runspace ExShellRunSpace = RunspaceFactory.CreateRunspace(ExShell);
ExShellRunSpace.Open();


Next, create a Pipeline within the RunSpace for each PowerShell cmdlet.  In the example below I'm creating two pipelines to handle two discrete PowerShell cmdlets within a single RunSpace.


Pitfall:  A pipeline must be created for each PowerShell cmdlet you wish to run within the RunSpace.


            Pipeline mbxEnableUser = ExShellRunSpace.CreatePipeline();
Pipeline mbxSetMail = ExShellRunSpace.CreatePipeline();


Create a string that contains the full cmdlet and parameters you wish to invoke.  In the example below, in the first string, I'm setting the WindowsEmailAddress attribute on a user object.  In the second string, I'm mail-enabling the same user on a targeted Exchange database (go here for my blog that explains the process for determining what Exchange database to apply),  applying a ManagedFolderPolicy, setting a PrimarySMTPAddress, and, of course, specifying a domain controller.  The variable values, tbUserName and rblEmailAddressare called from a textbox and radio button control on the web page.  The dc and policy variables are assigned in the code and the mdxdb variable is called from a text file that is the output of another process that is explained here.  You'll note that that in the second string,


Pitfall:  If you call a variable that has spaces, like a policy, you must place quotes around it.  The example below demonstrates how to do this.


      string mbxMailAttrib = "Set-User " + tbUserName.text + " -WindowsEmailAddress " + rblEmailAddress.Value;
string mbxEnablestr = "Enable-Mailbox " + tbUserName.text + " -Database " + mbxdb +
" -ManagedFolderMailboxPolicy \"" + policy + "\" -ManagedFolderMailboxPolicyAllowed
-DomainController "
+ dc + " -PrimarySmtpAddress " + rblEmailAddress.Value;


Pass the string into the pipeline using .AddScript() and then invoke the command.  When you invoke the pipeline, you are executing the PowerShell commands and returning status. 


            mbxSetMail.Commands.AddScript(mbxMailAttrib);
mbxSetMail.Invoke();
mbxEnableUser.Commands.AddScript(mbxEnablestr);
mbxEnableUser.Invoke();


Last, I do some error handling, passing the result back to the web page.  Admissibly, my error handling could be more robust and I could decipher the error codes and pass a more friendly string, but remember, I'm not a dev-guy and isn't that a Get-Out-of-Jail card for dev wannabes?


            if (mbxEnableUser.Error.Count != 0)
{
StringBuilder SB = new StringBuilder();
foreach (object item in mbxEnableUser.Error.ReadToEnd())
{
SB.AppendLine(item.ToString());
}
lblError.Text = "Error (Pipeline): " + SB.ToString();
}


Validation Techniques


I used validation techniques all over the place with this application.  I did this to ensure two things; that the end-user did not type in bad data and to ensure uniqueness in the directory for various attributes.  I used several ASP.NET validators, all built into Visual Studio 2008.  Within the UI I used the RequiredFieldValidator, RegularExpressionValidator, and CustomValidator.  While the Required and Regex validators don't require much in the way of discussion, the Custom Validator does.


The Custom Validator creates a method that is placed on the code page and will return a PageIsValid = False if the validation fails.  These custom validation method can contain any code, so it was perfectly suited to my use.  In the example below, I use a custom validator to determine if the name of a resource mailbox is used in the Active Directory already.


This example may look similar if you read the section onActive Directory web service above.  Just like the AD web service, I get the Active Directory domain name using the standard .NET library.


        private string domainDNC {
get {
Domain dom = System.DirectoryServices.ActiveDirectory.Domain.GetCurrentDomain();
DirectoryEntry rootDSE = new DirectoryEntry("LDAP://" + dom.Name + "/rootDSE");
string domainDNC = (string)rootDSE.Properties["defaultNamingContext"][0];
return domainDNC;
}
}


Next, I target a specific OU to keep the returned value cost down and authenticate securely.  Note that this code is located within the Custom Validation method.


        protected void ValidateResourceMBXName_ServerValidate(object source, ServerValidateEventArgs rgnamearg) {
try {
DirectoryEntry deName = new DirectoryEntry();
deName.Path = "LDAP://ou=xyz," + domainDNC;
deName.AuthenticationType = AuthenticationTypes.Secure;


Setup up the search, pass in the value you wish to search for and invoke the search.


        DirectorySearcher deSearchName = new DirectorySearcher();
deSearchName.SearchRoot = deName;
deSearchName.SearchScope = SearchScope.Subtree;
deSearchName.Filter = "(cn=" + rsrcName + ")";
SearchResult rsrcResult = deSearchName.FindOne();


The last step is set true or false on a boolean variable and pass that back the application for processing.


Pitfall:  If this method returns true, it means that there is already an AD account with the name the user is trying to create.  As a result, the call errors.  So this is kind of backwards from what you would normally want from a validator.


        if (rsrcResult.Path != null) {
uniqueRGname = false;
}
else {
uniqueRGname = true;
}
}
catch (Exception) {
uniqueRGname = true;
}
}


Deployment


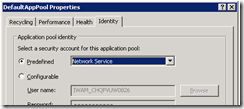
There are several pitfalls and some potential security issues related to deployment.  Key among the issues is the lack of remoting in PowerShell v1.  PowerShell v1, in combination with Exchange 2007 uses direct authentication against the domain to ensure the user has the rights required to execute a command.  When calling PowerShell from a web application, the web server uses the application pool identify settings as the context under which is passes the application request.  This is problematic for us, because we don't want to give administrative level rights to Exchange to the built-in accounts predefined by the application pool.  By default the web server uses the Network Service as it's "run-as" account.


Pitfall:  When in development, the built-in web server used for debugging with Visual Studio hides this problem if you are logged on with credentials that have Exchange Administrative rights.


image


To further explain the problem, the authentication path for this application goes something like this:


1.  The user authenticates to the web server


2.  The user submits some data to the server that calls a PowerShell command.


3.  The Web Server uses its application pool identity settings and passes the command to to Exchange.


4.  The command fails because the standard application pool identity is the built-in Network Service which does not have rights to Exchange.


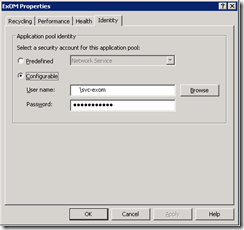
Remoting, which is available in PowerShell v2 can solve this problem by executing under the credentials of the logged on user, over-riding the application pool identity settings.  However, with this application was developed using PowerShell v1 and, as a result, required me to finesse the security settings.  I did this by creating an Exchange administrative proxy account that I used on the application pool.


image


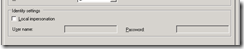
I also ensured that no impersonation was happening in the web.config file.  This is a major security risk because the credentials are placed in clear-text in the web.config file.


image


Conclusion


So there you have it.  The foundation for a simple application that can manage Exchange using PowerShell without distributing the Exchange Console, PowerShell, or the Exchange Shell.  There are tons of other possibilities, and once you have this foundation down, you'll be in a great position to get really creative.

OCS 2007 R2 User Provisioning and Deprovisioning with C#

My customers often wish to automate the provisioning and deprovisioning process for OCS.  While I'm not an application developer by training, I was able to develop a simple application in C# that met my customers needs.

Using Visual Studio 2008, I created a new Windows Console application in C#.  To make the code more portable, I decided to experiment with the System.Configuration .NET reference component to pass in configuration variables that are stored in a standard XML configuration file.  This will make the job of changing configuration information much easier on the administrator.

The configuration file must be located in the same directory as the compiled executable and must be named specifically to match the name of the executable and have a .config extension.  A best practice is to create a new file in the Visual Studio IDE Project Explorer window pane.  In my case, the C# namespace will serve as the name of the compiled executable, so my configuration file is named OCSProvision.exe.config

As noted, OCSProvision.exe.config is written using standard XML.  The file looks like this:

clip_image002[7]

Each configuration key is called from within program.cs and variablized as a string that can be used subsequently throughout the application. 

clip_image002[9]

Additional variables are created to handle log file name and a variable that will be used to distinguish if a user that will be deprovisioned has been inactive for a specified amount of time.  Program.cs is the main code page for the application.

The next piece of code will create a log file directory in the location specified by the configuration file.

The log file itself is created using the logpath variable collected from the configuration file and the dt string derived from DateTime.Now. 

clip_image002[11]

The format will output as such:

c:\ocsprovlog\ocslog-01-12-2010 10.01.32AM.log

The next stage in the code is to provision users.  While not the most elegant method, OCS uses WMI as the mechanism for executing administrative tasks.  My fingers are crossed that the OCS product group will follow the Exchange teams lead and provide native PowerShell support for the next release of OCS.

The next bit of code will bind to a specific OU in Active Directory (determined in the configuration file)…

clip_image002[13]

Note: While looking at each item returned by the AD query above, the code will attempt to retrieve the OCS attribute Primary Home Server.  This is a critical step because if this value is populated, the code will do nothing and move on to the next item in the search array.  If this attribute is not present, the code will throw an ArgumentOutOfRangeException error and move to the Exception catch where the OCS enable will occur.  If another type of exception is thrown, the code will move the the standard Exception catch and log the error.  If no exceptions are thrown and the array is fully exhausted, the nowork variable is flipped to TRUE and the code moves to the deprovisioning process.

…search for users that are not OCS-enabled…

clip_image002[15]

…and call the OCS WMI provider. logging a successful enablement.

clip_image002[17]

Several predefined variables will be bound to specific WMI attributes and the user will be OCS-enabled.  A log entry is written for each successful enablement.

clip_image002[19]

A final catch is included to handle any exceptions.

clip_image002[21]

After provisioning is complete, the code will move on to deprovisioning.

OCS deprovisioning will look at a specific OU (designated in the configuration file), validate a user has been there for a specific number of days (also designated in the configuration file), and then remove all OCS-specific attributes, effectively deprovisioning the user.

The first step in the process will query the designated AD OU and pull out the MSRTCSIP-PrimaryUserAddress and the date/time the user object was last modified.

clip_image002[23]

The code will then look at all returned user objects and calculate the number of days have passed since the object was last modified.

clip_image002[25]

If the number of days is greater than the configured value, in our case 7 days, the users OCS attributes are picked up using a WMI query…

clip_image002[27]

…and the user is deprovisioned.

clip_image002[29]

Like the provisioning process, I’m using an specific exception to determine if the there is work to be done and a standard catch to handle any other exceptions.

clip_image002[31]

A log entry is written if no work is done and the log is closed.

clip_image002[33]

My customer CRONs this code to run it on a regular basis.

-Enjoy.  D.